When thinking about organizing my pantry I drool over
Alejandra's pantry organization and dream of mine being as beautiful as her's (see video, below).
Then, reality sets in. I don't have the space she has, nor the disposable income (at this time) to get all the cool gadgets and organizing systems she uses. I did, finally, get a label maker, and that has made a huge difference in the organizing process. Not only do I have visual reminders of where things are and go, but my family can now find things without asking me (ha!).
This is what I have come up with, for now:
First, the BEFORE shots:
 |
| BEFORE |
 |
| BEFORE |
As shown above, things are just thrown in, willy-nilly, any old place that there was space. There was no reason or rhyme to this system. Actually, "system" is too strong a word for what we had here.
Now, let's look at each shelf, individually. We will start at the top and work our way down (I mean top shelf, not top of stand-alone pantry. I have not even looked at what is sitting on top of this unit,
TOP SHELF
 |
| Before |
 |
| After |
The top shelf is for mainly canned goods and other items that I need to see well or I use often.
I have divided the top shelf into three zones. The far left is for canned gravy, soup, and miscellaneous canned and jarred goods (tuna, sweet peppers, etc.)
 |
| Far Left: Gravy, Soup, & Misc. |
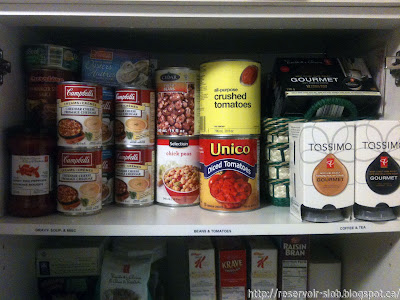
The center of the shelf has canned beans, legumes, and tomatoes.
 |
| Center: Beans, Legumes, and Tomatoes |
The far right is for all the coffee and tea. I have put most of these in a nice wicker basket that is easy to pull out and look through as we need them. I have the coffee we use the most right out front. We only drink tea occasionally so I put those in the basket, as well as the extra coffee, and hot chocolate.
 |
| Far Right: Coffee, Tea, Hot Chocolate |
SECOND SHELF
 |
| Before |
 |
| After |
On the second shelf I have added some miscellaneous helpers and odd pasta with cereal and oatmeal on the opposite side. Originally all these items were in nooks and crannies wherever there was a space. The cereal was in two different locations and the instant oatmeal was usually pushed to the back and forgotten.
 |
| Far Left: Helpers, Grains, and Misc. Pasta |
At the far left we have helpers, grains, and misc. pasta in a easy to pull out plastic bin. This keeps the bags and small packages contained.
 |
| Far Right: Cereal & Oatmeal |
On the far right I have all our cereals and instant oatmeal packets. Before, we had some cereal on this shelf and the rest on different places in the kitchen. Now we can see how much cereal we have left and can have more choices as well.
To Be Continued...(Next Friday)
If you are just getting started with Evernote, I suggest that you buy Brett Kelly’s remarkably practical e-book,
Evernote Essentials, Second Edition. It is worth setting aside a couple hours to work through this brief, 95-page book. It will save you DAYS of learning Evernote on your own.


No comments:
Post a Comment