Thursday, September 5, 2013

Days 3 - 5 of the 91 Day De-Clutter Challenge Week #1: Kitchen & Pantry

Pantry, Cabinets, Drawers

I have already worked over my pantry, cabinets, and drawers not too long ago. You can see these posts here:


Now, I am not quite finished with all the cupboards, nor all the drawers, however I had a bit more work this week than I originally expected and was unable to get to all the things I had planned in the kitchen. Mind you, I still have a couple of days to go.

In order so you have something to look at, here is a video of our bird, Taz, rearranging my gadget drawer:


Taz is a Senegal parrot. She is 18 years-old in this video. She has been living with us for approximately 6 months now. She is a plucker but we are trying to gently break her of that habit. Her feathers are growing back, but some will never grow back. Taz is a good girl and a very happy and healthy bird.

My husband came into the kitchen with Taz and she decided to help me with my gadget drawer.  She was being totally adorable and active. She slowed down when she saw I was filming and picked up again when I put my iPhone down. (All those measuring spoons went through the dishwasher after she was through with them.)

I need to re-arrange my kitchen to add a computer desk and work station in it. I will take the rest of this week to do that and will post about as soon as I can.


Tuesday, September 3, 2013

Day 2 of the 91 Day De-Clutter Challenge Week #1: Kitchen & Pantry

Refrigerator and Freezer

My two week menu list
puttied to a cupboard door.
As I mentioned in my last post, I had just finished my grocery shopping and am totally stocked up for two weeks worth of menus. The refrigerator is overflowing. At the end of the two weeks it is practically empty and you would think we are starving, but we are not. I work my menu plan to use up all the food purchased, with minimal waste, and use the most perishables first with the canned and frozen last. It still surprises my husband (after 26+ years) that I can put a healthy, nutritious, delicious, and filling meal on the table when we have "nothing left to eat" at the end of the two weeks. But, I digress.

I did forget to take a before photo of my freezer.  I do not have a separate chest freezer, only the tiny one on our refrigerator. At the end of the two weeks this too is nearly empty. However, here it is stuffed as full as I can get it.

The freezer - After
This is as tidy as i could make it and still stuff everything that I needed in it back in. I do wish I had a larger freezer or a chest freezer. It would allow me to purchase more bulk items and have them longer.

Refrigerator Door - After 
I forgot to take a before photo of the refrigerator door. I know this after photo (above) could easily be a before shot for many people, but trust me, it was much worse before I started. I did get rid of all expired items, wiped down the shelves, and restocked the door. My husband keeps some of his meds in the door, as well, so I had to make sure I had room for those. Some of the items in the door are nearly empty and by the end of the two weeks the door, too, will be more roomy and tidy looking.

Finally, I remembered that I was to take some before shots. Here is the before of the refrigerator, proper.

Refrigerator BEFORE
Things are just shoved, willy-nilly, everywhere and anywhere in the fridge. I also need to wipe up the many spills on the fridge floor. I took everything out of the refrigerator and wiped down all the shelves and floor. Then I put everything back in.

Refrigerator AFTER
As you can see, it is still pretty full looking, but it is better organized with the things that need to be consumed first easier to access first. It is on the smaller size scale of regular sized refrigerators so I have to really make sure I know what is in it at all times to ensure nothing spoils or gets forgotten.

Scary Doors
I still need to tackle the fridge/freezer doors. It has been on my To-Do list for months. I ran out of energy but will try to get to it shortly. 


Monday, September 2, 2013

91 Day De-Clutter Challenge Week #1: Kitchen & Pantry

http://maryorganizes.com/
Mary from Mary Organizes Blog has set up a 91 day challenge to help people declutter their homes. I've decided to join along and try to declutter with her. I don't have some of the rooms she has on her list so I will do other rooms/areas during those weeks.

Schedule
I thought I would start with the before photos. I should come clean (pun intended) and give you full disclosure.  I did let the kitchen go for a couple days in anticipation of this challenge. I wanted to make the after photos more dramatic. These photos were taken after supper and before doing the dishes (and the after supper cleaning). I also had gone shopping earlier in the day and had not put away the non-perishables. Now I am thinking I should have taken the photos after the dishes were done and the rest of the groceries put away.

Kitchen Before View (before dishes are done, too)

The rest of the before photos of kitchen.
This is the side that really needs declutteing.

Sunday, September 1, 2013

Storage Container Cupboard
Before | After
I got a head start on the challenge with the cupboard that I store my storage containers. It had become quite chaotic and needed a thorough going through. Any container missing lids and any lids missing containers were disposed of. 

Potatoes and onions are kept here because it is cool and dry. 

There are a few microwave pots and Tupperware, neatly stacked, as well as a rarely used food processor and slow cooker. You will notice that most of the lids are stored vertically with a plate rack. It makes it easier go find when needed. The rack was purchased inexpensively at Dollarama.

On the upper shelf (left side) cutting boards are also kept vertically. As I need a cutting board, I take the one on the right (by the lids) and replace them on the left (by the wall). This allows the cutting boards to be rotated often and used evenly for wear and tear. They are discarded when they are well used and falling apart.

Now I am ready to start the challenge.


Friday, June 28, 2013

Habits Can Save You Money

FlyLady Logo (c) FlyLady
(c) FlyLady
In our household only my husband has a steady job (ie, income) so we need to be frugal. I plan out our meals a head of time, make up shopping lists, and pretty well stick to the list. I budget for things we need and want. And, I try to make do with what we have, re-purpose items, and repair what can be repaired.  Any money I make from my part-time job or my artwork goes back into the family or gets us the little treats that make life worth living (books, art supplies, music).

In one of FlyLady's Morning Musings Marla Cilley wrote about how our Habits Can Save You Money. There are some obvious ideas such as "you save by paying your bills on time and not running up your credit cards", but have you considered that "if you did not spend $20 a week on more clutter then you would have saved $1040 a year."? Read Marla's essay. There are five (5) good, strong tips that will help you save money.

FlyLady's Morning Musing: Habits Can Save you Money, by Marla Cilley


Friday, June 7, 2013

The Kitchen Wall


Our kitchen is large for an apartment but like many kitchens there is very little usable storage space. Luckily there was a large empty wall by the stove. I decided to use it as both a decorative and useful space. On this wall I have many of the things that I need to have near at hand when I a cooking. 


I have even added the dry measures to the side of a cupboard where I can easily reach them. These help to add colour and interest to the area.


This wall is the focal point of our kitchen. It turns a boring, dull space into a colourful area of interest. I am very fond of roosters and chickens. It could be my Portuguese heritage coming through with the love of Barcelos's Rooster. (In truth, I am very fond of birds. Period.)

People who know I am an artist often ask if I painted the tree and bird motif on the wall. I did not paint the tree and bird motif on the wall. That is a wall decal that I found at a favourite shop. The rooster hooks are painted wood and those were found in a specialty shop many years ago.

All items are placed far enough from the stove to not interfere in cooking or be a fire hazard.


Here is a close up of the dry measure scoops. I have them on self-adhesive hooks. These are used nearly on a daily basis so they don't have time to collect dust or a fine mist of cooking grease on them. It is handy to have them so close and accessible. 

I hope my post has inspired you to think outside the box/cupboard/drawer in finding storage solutions that are both interesting and useful.


See you next Friday!

If you are just getting started with Evernote, DeClutter Artista suggests that you buy Brett Kelly’s remarkably practical e-book, Evernote Essentials, Second Edition. It is worth setting aside a couple hours to work through this brief, 95-page book. It will save you DAYS of learning Evernote on your own.


Friday, May 31, 2013

The Spice Cupboard


I call this my spice cupboard even though there are are plates and bowls in this cupboard. This cupboard is out of hand. Everything is shoved in there where ever these is a space. It is difficult to find anything in a timely manner.


The refills for the spices kept under the cupboard are kept here. The spices that are used more rarely, and for the bulk-size of the spices used daily, are also kept here. Once the spices are under control, the rest of the cupboard can get under control too.


The first thing to do was to remove nearly everything from the cupboard. I placed everything on the counter. It was a huge mess. I have way too many of those ramekins. Some will be used to house small items and the rest will find a new home.

The older, expired, spices were discarded. Any spices that did not have an air-tight container were placed in labeled zip-lock sandwich bags.


I picked up a small basket at Dollarama* (dollar store) that fits nicely onto the cupboard shelf. Inside I am placing all the extra spices and rarely used spices. I can easily slide the basket out when I need to access the items inside. I am planning on only purchasing enough spices (bulk store) to fit the spice containers, going forward.


It took a while to figure out where to put things in the cupboard. It is not 100% complete as we need to live with this for a bit to see if it is working.


I didn't really touch the top shelf, except to move the peanut butter done an shelf. On the top shelf are the less used soup bowls as well as my manual food processor and a few larger bowls. A couple of larger bowls do sit on top of the dinner plates because they are used almost daily. It made sense to move the peanut butter down, as well, as I am often reaching for it. I used to keep it in the pantry but it kept making its way to the counter or this cupboard so I stopped fighting it and just gave it a home here.

Between the peanut butter and the measuring cups is a container of bag clips. We often use these and it is good to have a central home for them. By putting these in a visible central location, with its own label, I am hoping that they will find their way back home (instead of being left all over the apartment) and that my men will stop asking me where they can find one to clip their bag-de-jour.

The shelf, beneath that, has my smaller plates as well as the most used soup bowls. I have also labeled three of those ramekins to hold elastic bands, bread clips, and odds & ends. I need to label the small round wooden box, as well. It is holding the extra blades to my “Graty”.


Here is the spice end of the spice cupboard. Yes, I do use a lot of spices in my cooking! The dollar store basket is easy to pull out in order to refill the spice jars or to grab the seldom used spices. Everything is now in air-tight containers or bags.  Above that shelf I have more spices and my most used measuring cups. I also have little stainless steel bowls that I use when measuring out spices and ingredients. I like to get all my ingredients out and in cooking order, so that when I actually start cooking everything is ready to go. (The two clear things in the metal containers are caps you put on your soda-pop can so that you can drink from it, and then cap it, if you don’t finish off the can.)


If you are just getting started with Evernote, I suggest that you buy Brett Kelly’s remarkably practical e-book, Evernote Essentials, Second Edition. It is worth setting aside a couple hours to work through this brief, 95-page book. It will save you DAYS of learning Evernote on your own.


I love adding labels to help me remember where things belong, and to assist my family to know where to expect to find items. Labels are such simple things that make a huge difference in our mindset.

Overall, the cupboard is much neater and more user-friendly. We’ll live with this for a few weeks to see how it is working, and make any tweaks that we feel necessary.


See you next Friday!

*I have no affiliation to, nor am I paid by, Dollarama. It is just a local and convenient dollar store.


Friday, May 24, 2013

Sandi Richard's "There's a Meal to My Madness"

http://www.cookingfortherushed.com/new/index.php/womens-event
Sandi Richard in Strathroy, Ontario
www.SandiRichard.com

http://www.cookingfortherushed.com/new/index.php/book5
In 1999 I came across the most amazing cookbook: Life's On Fire: Cooking for the Rushed by Sandi Richard. At the time I was the mother of a precocious 8 year-old, running a full-time business, and living the life of a stressed super-mom/woman. We were eating out, going through the drive through, and ordering in more days than not. It was not healthy, but I did not know how else to handle the dinner time stress. This book was a Godsend.

Sandi's open and honest style was refreshing to read. I enjoy how her book is laid out and how you start at the top of the page and when you get to the bottom you have a well balanced, full course, meal to feed your family. Sandi, being Canadian, wrote the ultimate Canadian cookbook. (We shop in metric and cook in imperial and the book is written like that). I like weekly shopping list, and I especially relish that every recipe can be put together quickly and are as delicious as they are nutritious. The meals are colour coded such:
RED: 15 minutes to prep
Dinner is ready in 30 minutes or less
YELLOW: 20 minutes to prep
Dinner is ready in 30 minutes or less
GREEN: 15 minutes to prep
Dinner is ready in 60 minutes or less
BLUE: 20 minutes to prep
Dinner is ready in 60 minutes or less
                                       What Make's Our Books Different - Sandi Richard
Cooking is something I enjoy but I dreaded the "what's for dinner?" question it's sister "what do you want?" usually followed by "I don't know, what do you want?" I found it difficult to plan and shop around my busy schedule, and sure as heck, the drive-through was far faster than anything I could pull together on a hectic week night. Sandi's book took all the stress out of the planning and the making of the shopping lists. It was done for me. My family loves the recipes, and suddenly I was cooking again and it was not taking any longer (or any more effort) than going through the drive-through or ordering in. And, as a bonus, we were saving money because we were purchasing what we needed for each week without any waste or excess.

Over the years I have been making up my own menus and using other cookbooks because, let's face, there are only so many times you can use the same cookbook over and over again before you want try something new. Yet, my family would ask for specific meals from Cooking for the Rushed, every so often, so my copy is quite well used.

http://www.cookingfortherushed.com/new/index.php/anyone-can-cook-dinner
Sandi Richard has been my hero since I discovered her cookbook in 1999 so imagine my delight when I found out she was going to be talking in a city near me! Sandi is doing the There's a Meal to My Madness Event where she is promoting a healthy lifestyle, encouraging us to get the family back to the dinner table, and showing us how easy it is to plan your meals, make your shopping lists, and cook every night. Her books and recipes allow me to be on automatic pilot throughout the week.

Several friends and I went to see Sandi Richard in Strathroy, Ontario. We were not disappointed. Sandi is a dynamic, motivational, and inspirational speaker. She regaled us with stories from her life, talked about Eating Forward (TM), explained how her method of meal planning makes it easy to always have a nutritious meal on the table, and even had a cook-off! I picked up the few cookbooks I did not have (Sandi has 7 books now), had them signed, and enjoyed chatting with her.

If you are just getting started with Evernote, I suggest that you buy Brett Kelly’s remarkably practical e-book, Evernote Essentials, Second Edition. It is worth setting aside a couple hours to work through this brief, 95-page book. It will save you DAYS of learning Evernote on your own.

There is something special about Sandi's books, perhaps because there is something special about Sandi. Her books are so easy to read, make perfect sense, and are fun. The meals are a hit with my family (and most families). I really enjoy not having to stress over meal-planning. She has done it all, except shop and cook, for me. And, she even makes shopping and cooking easy. I really like how she gives you the tools to create your own meal plans if you choose not to follow hers. Also, if you go to her site (http://www.sandirichard.com) you can sign up for the tool that allows you to create custom menus and shopping lists from any of her cookbooks (you still need the book for the actual recipes). I signed up and have already created three customized menus and shopping lists.

Sandi Richard is serious about trying to help families get back around the dinner table, save time, and money, and eat healthy and nutritious meals. If you have a chance to see Sandi live, go for it! You will enjoy it. And, go pick up at least one of her books. You will be hooked.

Here are some Sample Recipes.

I have all 7 of Sandi's books, now, so it is going to be a very long time before my family gets bored. I have been cooking from her new cookbook for the last two weeks and my family is thrilled. We are eating better, the meals are fabulous, the stress level is down, and bonus side-effects: we are losing weight and have more energy!

See you next Friday!


Friday, May 17, 2013

Gadget Drawer

BEFORE --> Extreme Chaos
Every time I opened this drawer I would cringe at the mess. I had to dig around to find anything. It has been on my to-do list to organize for a long time.

I picked up 4 plastic drawer organizers from Dollarama (a dollar store). I still need another, shorter, more square one to replace the red mesh basket that I have squished back in to hold my measuring spoons.

Plastic Drawer Organizer from Dollarama

AFTER --> Better
I may get one more of the long plastic drawer organizer, instead, for the measuring spoons and put those measuring cups in front of that.

The most used gadgets and measuring spoons are closer to the front of the drawer. The items that are used less are further back, but still within reach. I got rid of any gadgets I never use. There were some items in this drawer that are better kept elsewhere, such as plastic cutlery and larger knives.

That red mesh basket is bothering me, however, it will have to do for now, until I can get out again to get another clear plastic organizer.  Once I have this drawer more how I envisioned it, I will add sticky-tac to the bottom of the plastic organizers to keep them from shifting, and add labels to help me remember everything's place in the drawer.

I do use a lot of measuring spoons when I cook, but I may cull these a bit more.  I have a touch-less can opener and my garlic press together right behind the measuring spoons because I use those nearly every day.

This drawer will be revisited in the future, after I have lived with it for a while, to see what works and what does not.

If you have any ideas about organizing the gadget drawer, please feel free to share them with us.

If you are just getting started with Evernote, I suggest that you buy Brett Kelly’s remarkably practical e-book, Evernote Essentials, Second Edition. It is worth setting aside a couple hours to work through this brief, 95-page book. It will save you DAYS of learning Evernote on your own.


See you next Friday.


Friday, May 10, 2013

No Longer Suffering

First, I apologize for not posting last week. I was having a very hectic week and just did not have the time to write up a post.

This week I want to tell you about FlyLady.
(c) FlyLady http://www.flylady.net/
www.FlyLady.net
Marla Cilley is The FlyLady. Since 1999, she has been a mentor
to over half a million women teaching them
how to organize their homes and how to love themselves.
Back in the early 2000s I was suffering from a pretty severe depression. It kept me from doing anything, and the less I did the more depressed I became. I am an artist and had not painted anything in years because I did not feel I deserved to create art if my home/life was such a mess. It was a vicious circle and I was spiraling out of control and towards suicidal feelings.

Then, one day as I was reading Dear Abby online I saw the mention of The FlyLady. I immediately tried to go to her site but so many people were trying to look at her site at the same time that it crashed her server. Still, I decided to try again a few days later and I am glad I did. The words "Are you suffering from CHAOS (Can't Have Anyone Over Syndrome)" were the first words I saw and I was hooked.

The more I read on her site the more I was convinced this woman was spying on my life. I shined my sink and signed up for her email, and started to follow her system.  

Slowly my life started to come together again, and I felt a weight load off my shoulders. My depression started to leave as well. And, FlyLady gave me permission to do my artwork, even if I was not finished de-cluttering and cleaning. I felt like I was born into a new life. My home and life are still not "perfect" but they are a lot better than they were "before FlyLady". 

I picked up Marla's book, Sink Reflections. It, in my mind, describes the system in a more understandable way than does the website, and I would highly recommend picking up a copy. Also, read this post by FlyLady: Suffering Alone. She really describes how many of us are feeling.

I've learned that even doing a little helps. As FlyLady says: "It did not get messy overnight and you can't expect it to get cleaned overnight. Setting a timer for 15 minutes helps you not get distracted. You can do anything for 15 minutes. Baby-steps not perfection. If you don't love it, need it, or use it --> out it goes. Divide your home into zones and work on one zone a week. You can't organize clutter, you can only get rid of clutter."

If you are just getting started with Evernote, I suggest that you buy Brett Kelly’s remarkably practical e-book, Evernote Essentials, Second Edition. It is worth setting aside a couple hours to work through this brief, 95-page book. It will save you DAYS of learning Evernote on your own.

Over the years I have learned to let go of clutter, I have joined a very friendly and extremely active local FlyLady support group and have made some wonderful and supportive friends, I have been actively creating art, I have been involved in my community, and, although I still get depressed at times, it has never been to that horrible low and I no longer get suicidal feelings. In essence, Marla Cilley - The FlyLady, saved my life.

By shining my sink I have regained control over my life, my home is better, my marriage is better, and I'm a better me.

See you next Friday!


Friday, April 26, 2013

Spice Storage

Under cupboard spice storage system
This is how I store my spices for easy access. It has created extra space on my counter and in my cupboard.

View from the front

Side view

Magnet hot glued to top of spice jar. Labeled at bottom for easy legibility
To make this I attached a piece of sheet metal (2"x48"x1/8") to the underside of the cupboard (I used Elmers Ultimate Glue and had it held in place for 24 hours with c-clamps. (I put newspaper down on the counter and sink to catch drips).

Strong magnets were attached to the lids of spice jars using a hot glue gun. I wrote the spice names on address labels and pasted them on the jars.

When all was dry, the jars were attached to the underside of the cupboard with the magnets. They are easy to retrieve when needed and easy to put back when finished.

Currently there are 20 spice jars (seen here) but I have room for 7 more on this piece of metal and will be adding at least 3 more to this group.

If you are just getting started with Evernote, I suggest that you buy Brett Kelly’s remarkably practical e-book, Evernote Essentials, Second Edition. It is worth setting aside a couple hours to work through this brief, 95-page book. It will save you DAYS of learning Evernote on your own.

I have arranged the bottles with the ones I use the most closest to the stove (right) and the ones I use the least further from the stove (left) then by category as well (baking, savory, Italian, etc).  You can arrange alphabetically, by colour, by type, or whichever way makes sense to you.

I do have a spice cupboard, that I will be re-organizing in the coming months. In it I keep the rarely used spices as well as the refills for the jars.

See you next Friday!

UPDATE:

I was asked where I picked up the supplies to create this storage solution.
  • I had quite a few of the spice jars from a spice rack that we received as a wedding gift 25 years ago. Dollarama sells similar jars and I picked up the extra jars there. 
  • The spices are usually picked up at the grocery store or Bulk Barn.
  • The metal bar that was glued to the under-cupboard, the C-clamps, and the glue came from Rona 
  • The magnets were from Home Hardware
  • The glue gun and hot glue were purchased at Michaels Arts & Crafts 
I probably could have purchased all the hardware at Rona or Home Hardware but I did not purchase everything at the same time.


Friday, April 19, 2013

Freezing Chicken Broth

Whenever I cook a whole chicken, or I purchase a pre-cooked whole roasted chicken, I make chicken broth with the leftover bones. My recipe is very similar to this chicken broth recipe. I don't actually follow a recipe. I make several cups of chicken broth at a time. DH likes me to make fresh pastina for him when I make a batch, then I freeze the rest for another time.

©2013, Reservoir Slob, all rights reserved. Photo taken with iPhone 3
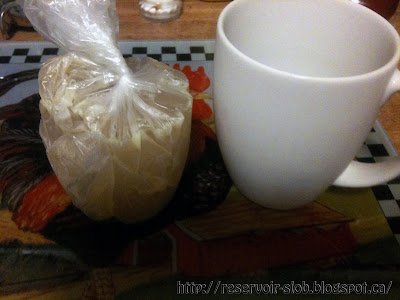
I like to freeze the broth in 1 cup amounts. I line coffee cups with a
plastic bag (Ziploc Portion Bags) and pour one cup
amount into each bag-lined cup. If you are careful you can wash and
re-use the bags until they rip.

©2013, Reservoir Slob, all rights reserved. Photo taken with iPhone 3
I freeze the broth.

©2013, Reservoir Slob, all rights reserved. Photo taken with iPhone 3
I then take the bag with the frozen broth out of the cup and tie the top with
a bread tie.

©2013, Reservoir Slob, all rights reserved. Photo taken with iPhone 3
I then place all the frozen broth into a larger freezer bag and put back
in the freezer for when I need them. I defrost as much as I need,
when I need it. I make sure to label the bag with date and contents.
This not only saves money on chicken broth, but you can make healthier, lower salt, lower fat broth. By freezing it in one (1) cup increments they are handy to grab and use, anytime.

I also use this to freeze my favourite home made pasta sauce in the amounts I need for meals.

You can use this method to freeze any sauce, broth, or liquid.


Friday, April 12, 2013

Pantry - Part 2

I am continuing with the pantry this week. Last week we did the top two shelves. I will continue with the next two shelves today.

THIRD SHELF

Before

After
On this shelf there are some containers of dry goods. On the left side are several plastic jars/containers of dry goods such as sugar, flour, rice, and dry lentils (their are more containers behind these ones in front).  On the right side are plastic bins that hold smaller packages and packages of pasta such as linguine, spaghetti, and penne. The top bin holds lunch snacks such as granola bars or oatmeal cookies.

You can see my attempt at labeling these items with a green paint pen. This was before I purchased a label maker. The green paint is wearing off from frequent use. Getting the label maker was an excellent investment and has made organizing easier and more enjoyable for me.

Far Left: Flour, Sugar, Rice, & Dry Lentils

Far Right: Pasta & Lunch Snacks
I'm certain that people with OCD are going crazy that my labels are not perfectly straight and aligned with each container. At one time this would have bothered me as well. However, life is too short to worry about trivial things. Perhaps, once everything is better organized, I'll revisit this and make prettier, straighter, more aligned labels. I'll try to do better on my following projects.

FOURTH SHELF

Before
After

Initially there was a lot of wasted space on this shelf. I decided to move all the vinegar and oil to this shelf, with the items used more often to the front. This is a lower shelf but I can still reach the front items without having to sit on a chair. I would need to sit on a chair to get the items further back.

Because of the arthritis in my back and legs, I keep an old office chair on wheels in the kitchen, so that I can reach the bottom shelves in the pantry, lower cupboards, and refrigerator.

Far Left: Oils and Vinegars

Far Right: Miscellaneous Extra Stuff (Storage)
On the far right I took advantage of the space to store some extra items that would normally be kept elsewhere, such are extra mayonnaise and peanut butter.

I want to get some of Alejandra's suggested systems and gadgets to enhance my pantry experience. I have added these to my wish list. Some time in the future I will revisit my pantry and implement a different (and hopefully, prettier and better) system. However, for now, it may not be beautiful, but it is mine, and it is working for us.

I hope you are still with me on the journey. Please subscribe to this blog so you do not miss the upcoming posts. I have several posts planned for the upcoming weeks, including one on paper clutter that I am sure you will enjoy.

Here, for your pleasure, is another video on pantry organization by DoItOnADime:


See you next Friday!


If you are just getting started with Evernote, I suggest that you buy Brett Kelly’s remarkably practical e-book, Evernote Essentials, Second Edition. It is worth setting aside a couple hours to work through this brief, 95-page book. It will save you DAYS of learning Evernote on your own.