Friday, April 26, 2013

Spice Storage

Under cupboard spice storage system
This is how I store my spices for easy access. It has created extra space on my counter and in my cupboard.

View from the front

Side view

Magnet hot glued to top of spice jar. Labeled at bottom for easy legibility
To make this I attached a piece of sheet metal (2"x48"x1/8") to the underside of the cupboard (I used Elmers Ultimate Glue and had it held in place for 24 hours with c-clamps. (I put newspaper down on the counter and sink to catch drips).

Strong magnets were attached to the lids of spice jars using a hot glue gun. I wrote the spice names on address labels and pasted them on the jars.

When all was dry, the jars were attached to the underside of the cupboard with the magnets. They are easy to retrieve when needed and easy to put back when finished.

Currently there are 20 spice jars (seen here) but I have room for 7 more on this piece of metal and will be adding at least 3 more to this group.

If you are just getting started with Evernote, I suggest that you buy Brett Kelly’s remarkably practical e-book, Evernote Essentials, Second Edition. It is worth setting aside a couple hours to work through this brief, 95-page book. It will save you DAYS of learning Evernote on your own.

I have arranged the bottles with the ones I use the most closest to the stove (right) and the ones I use the least further from the stove (left) then by category as well (baking, savory, Italian, etc).  You can arrange alphabetically, by colour, by type, or whichever way makes sense to you.

I do have a spice cupboard, that I will be re-organizing in the coming months. In it I keep the rarely used spices as well as the refills for the jars.

See you next Friday!

UPDATE:

I was asked where I picked up the supplies to create this storage solution.
  • I had quite a few of the spice jars from a spice rack that we received as a wedding gift 25 years ago. Dollarama sells similar jars and I picked up the extra jars there. 
  • The spices are usually picked up at the grocery store or Bulk Barn.
  • The metal bar that was glued to the under-cupboard, the C-clamps, and the glue came from Rona 
  • The magnets were from Home Hardware
  • The glue gun and hot glue were purchased at Michaels Arts & Crafts 
I probably could have purchased all the hardware at Rona or Home Hardware but I did not purchase everything at the same time.


Friday, April 19, 2013

Freezing Chicken Broth

Whenever I cook a whole chicken, or I purchase a pre-cooked whole roasted chicken, I make chicken broth with the leftover bones. My recipe is very similar to this chicken broth recipe. I don't actually follow a recipe. I make several cups of chicken broth at a time. DH likes me to make fresh pastina for him when I make a batch, then I freeze the rest for another time.

©2013, Reservoir Slob, all rights reserved. Photo taken with iPhone 3
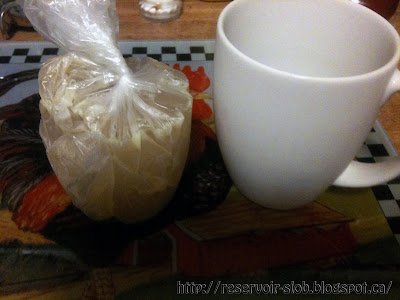
I like to freeze the broth in 1 cup amounts. I line coffee cups with a
plastic bag (Ziploc Portion Bags) and pour one cup
amount into each bag-lined cup. If you are careful you can wash and
re-use the bags until they rip.

©2013, Reservoir Slob, all rights reserved. Photo taken with iPhone 3
I freeze the broth.

©2013, Reservoir Slob, all rights reserved. Photo taken with iPhone 3
I then take the bag with the frozen broth out of the cup and tie the top with
a bread tie.

©2013, Reservoir Slob, all rights reserved. Photo taken with iPhone 3
I then place all the frozen broth into a larger freezer bag and put back
in the freezer for when I need them. I defrost as much as I need,
when I need it. I make sure to label the bag with date and contents.
This not only saves money on chicken broth, but you can make healthier, lower salt, lower fat broth. By freezing it in one (1) cup increments they are handy to grab and use, anytime.

I also use this to freeze my favourite home made pasta sauce in the amounts I need for meals.

You can use this method to freeze any sauce, broth, or liquid.


Friday, April 12, 2013

Pantry - Part 2

I am continuing with the pantry this week. Last week we did the top two shelves. I will continue with the next two shelves today.

THIRD SHELF

Before

After
On this shelf there are some containers of dry goods. On the left side are several plastic jars/containers of dry goods such as sugar, flour, rice, and dry lentils (their are more containers behind these ones in front).  On the right side are plastic bins that hold smaller packages and packages of pasta such as linguine, spaghetti, and penne. The top bin holds lunch snacks such as granola bars or oatmeal cookies.

You can see my attempt at labeling these items with a green paint pen. This was before I purchased a label maker. The green paint is wearing off from frequent use. Getting the label maker was an excellent investment and has made organizing easier and more enjoyable for me.

Far Left: Flour, Sugar, Rice, & Dry Lentils

Far Right: Pasta & Lunch Snacks
I'm certain that people with OCD are going crazy that my labels are not perfectly straight and aligned with each container. At one time this would have bothered me as well. However, life is too short to worry about trivial things. Perhaps, once everything is better organized, I'll revisit this and make prettier, straighter, more aligned labels. I'll try to do better on my following projects.

FOURTH SHELF

Before
After

Initially there was a lot of wasted space on this shelf. I decided to move all the vinegar and oil to this shelf, with the items used more often to the front. This is a lower shelf but I can still reach the front items without having to sit on a chair. I would need to sit on a chair to get the items further back.

Because of the arthritis in my back and legs, I keep an old office chair on wheels in the kitchen, so that I can reach the bottom shelves in the pantry, lower cupboards, and refrigerator.

Far Left: Oils and Vinegars

Far Right: Miscellaneous Extra Stuff (Storage)
On the far right I took advantage of the space to store some extra items that would normally be kept elsewhere, such are extra mayonnaise and peanut butter.

I want to get some of Alejandra's suggested systems and gadgets to enhance my pantry experience. I have added these to my wish list. Some time in the future I will revisit my pantry and implement a different (and hopefully, prettier and better) system. However, for now, it may not be beautiful, but it is mine, and it is working for us.

I hope you are still with me on the journey. Please subscribe to this blog so you do not miss the upcoming posts. I have several posts planned for the upcoming weeks, including one on paper clutter that I am sure you will enjoy.

Here, for your pleasure, is another video on pantry organization by DoItOnADime:


See you next Friday!


If you are just getting started with Evernote, I suggest that you buy Brett Kelly’s remarkably practical e-book, Evernote Essentials, Second Edition. It is worth setting aside a couple hours to work through this brief, 95-page book. It will save you DAYS of learning Evernote on your own.


Friday, April 5, 2013

The Pantry

When thinking about organizing my pantry I drool over Alejandra's pantry organization and dream of mine being as beautiful as her's (see video, below).


Then, reality sets in. I don't have the space she has, nor the disposable income (at this time) to get all the cool gadgets and organizing systems she uses. I did, finally, get a label maker, and that has made a huge difference in the organizing process. Not only do I have visual reminders of where things are and go, but my family can now find things without asking me (ha!).

This is what I have come up with, for now:

First, the BEFORE shots:

BEFORE
BEFORE
As shown above, things are just thrown in, willy-nilly, any old place that there was space. There was no reason or rhyme to this system. Actually, "system" is too strong a word for what we had here.

Now, let's look at each shelf, individually. We will start at the top and work our way down (I mean top shelf, not top of stand-alone pantry. I have not even looked at what is sitting on top of this unit,

TOP SHELF

Before

After
The top shelf is for mainly canned goods and other items that I need to see well or I use often.

I have divided the top shelf into three zones. The far left is for canned gravy, soup, and miscellaneous canned and jarred goods (tuna, sweet peppers, etc.)

Far Left: Gravy, Soup, & Misc.
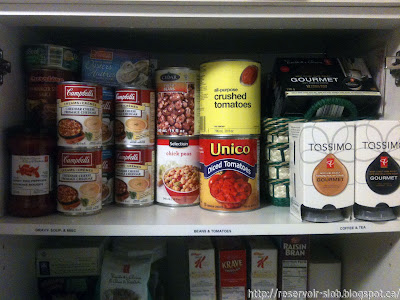
 The center of the shelf has canned beans, legumes, and tomatoes.

Center: Beans, Legumes, and Tomatoes
The far right is for all the coffee and tea. I have put most of these in a nice wicker basket that is easy to pull out and look through as we need them. I have the coffee we use the most right out front. We only drink tea occasionally so I put those in the basket, as well as the extra coffee, and hot chocolate.

Far Right: Coffee, Tea, Hot Chocolate
SECOND SHELF

Before

After
On the second shelf I have added some miscellaneous helpers and odd pasta with cereal and oatmeal on the opposite side. Originally all these items were in nooks and crannies wherever there was a space. The cereal was in two different locations and the instant oatmeal was usually pushed to the back and forgotten.

Far Left: Helpers, Grains, and Misc. Pasta
At the far left we have helpers, grains, and misc. pasta in a easy to pull out plastic bin.  This keeps the bags and small packages contained.

Far Right: Cereal & Oatmeal
On the far right I have all our cereals and instant oatmeal packets. Before, we had some cereal on this shelf and the rest on different places in the kitchen. Now we can see how much cereal we have left and can have more choices as well.

To Be Continued...(Next Friday)

If you are just getting started with Evernote, I suggest that you buy Brett Kelly’s remarkably practical e-book, Evernote Essentials, Second Edition. It is worth setting aside a couple hours to work through this brief, 95-page book. It will save you DAYS of learning Evernote on your own.